How to record a time lapse on your Mac using your screen, iSight or favorite camera!

24 03 2009

You’ve seen them before. The sunrises over the desert in less than 5 seconds. Someone takes apart a computer and puts it back together in 10 seconds. Time-lapse, or stop motion photography.

Time Lapse

Time-lapse photography is a technique in which each film frame is captured at a variable rate much slower than it will be played back. When these clips are replayed at normal speed, time appears to be moving faster and thus lapsing. Time-lapse photography is the opposite of high speed photography, where a higher number of frames are captured than is typical.

But how do you start making your own time-lapse? Even if you don’t own a Mac with a built in webcam, you can start by making your own time-lapses from your built-in screen. There are a number of great pieces of software available- so lets look at the required setup before we explore the software options.

You must have this basic hardware setup:

*A static camera: preferably a mounted camera or camcorder via steady tripod or otherwise rested on a non-moving object- but can just be your built in iSight.
*Power supply: both the camera and computer will need a consistent power source, especially over a long period of time.
*Good lighting: especially if you are shooting inside, it is important that the lighting stay consistent throughout the time-lapse- otherwise it may end up looking like a rave party with constantly changing lighting.

Once that is ready to go, explore some software options for capturing your time-lapse:

GawkerGawker is a free, open source alternative to iMovie or iStopMotion developed by Phil Piwonka. Not only can it take a time-lapse from your iSight or other attached camera, but also from your built in display. That isn’t where Gawkers features end, either. Utilizing Bonjour, you can share your camera and let others to record from your video stream. Multiple steams can even be created from up to four locations side by side. Get Gawker here!

iStopMotion-While a little pricey at $49, iStopMotion, developed by Boinx is a wonderful piece of software that will let you do more than just create a time-lapse and offers a great deal of control of your time-lapses. Download it here.

iMovie 6– In iMovie 6, which was available for free until iLife ’09 was released, offers a basic Time-Lapse function. You can start recording if you click on the Camera icon and choose Time-Lapse from the sub menu. In the box that appears, simply enable the time-lapse feature, and enter the rate at which you want iMovie to capture video frames- which will require a bit of forethought. If you want one frame per second you would enter 30 (since there are approximately 30 frames per second) and from there you can do the math. Note: if you do not have iMovie ’06 installed already, you are out of luck unless you happen to have an old CD laying around- Apple has discontinued software and both iMovie ’08 and ’09 do not have time-lapse capturing support.

Make your own Time-Lapse– By taking a steady clip that was shot in real time and speeding it up significantly, you can essentially create a time-lapse similar to the ones using specialized software.

Once you have setup your hardware and made your software choice, you can start creating time-lapses like these! Also worth noting, an awesome screensaver titled TimeLapse Screen Saver can continuously create a time-lapse from a camera, developed by Oriol Ferrer Mesià. Download the screensaver here.

Otherwise, have fun creating your own time-lapses, and feel free to share them with fellow readers of The iLife.


How to get started using BrightKite: Signing up and your first Post from your Comptuer

30 12 2008

In the upcoming series focusing on BrightKite, you will be able to learn how to setup and use the BrightKite location based social network.

BrightKite logo

BrightKite, a social network aiming to create a community based on the places people frequent was founded in Devner only last year. It entered a private beta period for almost about eleven months, and recently opened it’s doors to the public earlier this month. So if you don’t have an account- get one now and read on to get started using BrightKite!

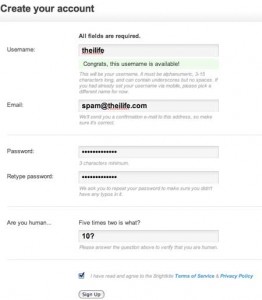
First thing is first, you need to get an account from BrightKite.com. The process is simple, but I’ll walk you through the first steps:

BrightKite Create Account

After you’ve entered all your account information, you can click next and be prompted with the next steps.

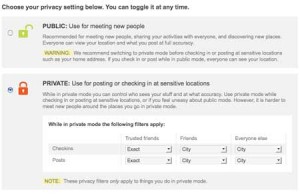
BrightKite Privacy Settings

By selecting your default privacy settings, you can control how much information you share and who else can see it. At any given time you can still toggle back between the modes, so this step isn’t crucial. To get the most out of BrightKite, I recommend using the “Public” setting- but beware that it will let others see where you have checked in.

BrightKite Check In

The next step will be to check in for the first time. While this isn’t required, you’ll want to check in at some point anyway- so why not? Simply enter a location where you are, which can be detailed as a street address or as vague as a zip code- or just a business address and press “Check In”.

BrightKite What's Happening

After that you will be displayed with “What’s Happening” in your area- which can either be populated with other BrightKite users activity around you, or empty because there is not enough activity. Above is the main web interface- which can seem a little confusing at first.

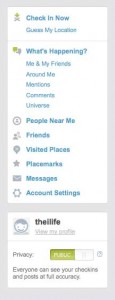
BrightKite Left Side Column

Broken into three parts, it’s rather trivial. The left most column is where all the action lies, where you click to Check In, have BrightKite guess your location (using nearby Wi-Fi hotspots) see What’s Happening around you, in the BrightKite universe, with only your friends. You can also see comments on your activity, mentions from other BrightKite users, visited places or your placemarks (places you bookmarked).

What's Happening?

The next two columns can change based on what you mode your in. For example, if you’ve selected the What’s Happening? The main view is focused only on things going on around you, comments or mentions to you, the entire BrightKite universe or just your friends. If you selected Visted Places, you’ll see a list of all the places you’ve checked into.

With this information, you’ll be able to get started using BrightKite. In the next article in this series, we will explore new ways of checking into BrightKite from mobile devices such as iPhone, iPod touch or just a simple cell phone. We have to thank Brady Becker, BrightKite founder, for helping me write this tutorial!


BrightKite: Social Networking meets the Real World

27 12 2008

Looking to explore some new ways of sharing your location? BrightKite offers the best tools for sharing your location.

BrightKite

Looking to sign up for yet another social network?!? In a crowed field of social networks, a Denver startup BrightKite aims to bring social networking down to the real world. While social networking has gone undeniably mainstream, with over 120 million active Facebook users and 3.2 million Twitter accounts, BrightKite’s network differs in an interesting way- bridging the real world to the internet. For those familiar with the iPhone application Twinkle, BrightKite borrows a few location concepts from Twinkle and builds a social network around them.

bright-kite_stream

On BrightKite, users may post about what is going on at a given location via a Photo or Note. Users can also “Check In” and show other users their current location. On your computer or iPhone, BrightKite can utilize location based services such as Skyhook (a Wi-Fi location service) or GPS to automatically approximate your current location. Additionally you have the option to manually input your location through a specific address business name or a preset “Placemark” (a bookmarked location).

BrightKite Map View

After Checking In on BrightKite through a web browser, you will see a map of your current location and a list of other BrightKite users who have recently checked in around you. Once you have added friends, you will also see their activity in your Placestream. You can then explore what your friends or other people are doing in more detail, view photos or notes they posted and even browse individual user profiles. The same applies if you are accessing BrightKite from one of the many supported mobile devices.

BrightKite Private View

If you consider your location to be sensitive information (which you probably should), BrightKite makes it simple to hide anything you don’t want others to see by allowing your information to be displayed either publically or privately. Beyond that, you can set many levels of privacy and accuracies that can even extend to your friends on an individual basis.

iphone

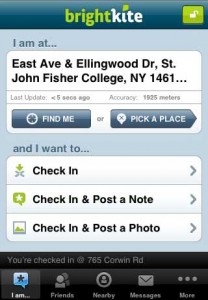
With the native BrightKite iPhone application, you can do virtually anything the full BrightKite website can, and on an iPhone 3G, the GPS hardware makes posting your location downright awesome. The application is very attractive, easy to use and doesn’t compromise any functionality.

In summary, BrightKite’s unique offerings make it a noteworthy social network, although it probably won’t replace Twitter or Facebook. While BrightKite is still currently in beta, if you go to their website and enter your email address, you can get an invite within about 24 hours (usually less).


Get the most from Twitter: Viewing Twitter and Tweeting from Your Mac

22 12 2008

In this coming series, I will be looking at the large number of ways of accessing and updating Twitter. For this first installment, we will focus on tweeting from the Mac.

Twitter logo

Twitter is the ubiquitous part social network part micro-blogging service that has approximately three million accounts and over five million hits a month. For some it has become an essential part of the internet including the average consumer to the hundreds of companies and high profile celebrities who use the service. Twitter users have a myriad of options to update or view their Twitter feed starting with the Twitter website (Twitter.com).

Twitter.com Interface

On Twitter.com, you can see an overview of recent tweets, sort @Replies, view and send direct messages to other users or only view tweets from your favorites. While this is everything the Twitter service has to offer, there are a number of advantages of using a dedicated Twitter client. Below are my two recommendations for Twitter clients.

Twitterific Interface

If you can get past the $14.95 price tag, Twitterific by the Iconfactory is by far the best client I have used hands down. The design is very clean and simple- utilizing the Apple “Heads Up Display” style of menu. On the bottom of the display you can visit your Twitter homepage, adjust Twitterific settings or manually refresh your feed. And if you have Growl installed, it will automatically display new tweets when they come in. Twitterific is not only the cleanest and simplest Twitter client, but under the hood is very powerful. Within the settings pane you can adjust for any configuration you like. It is worth the $14.95 if you enjoy Twitter and great Mac software.

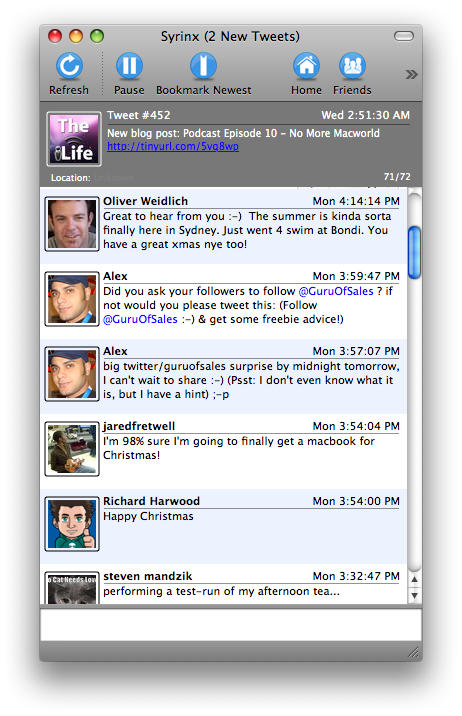
Syrinx

If the idea of paying for your Twitter client is hard to grasp, there are a number of free options to consider. Syrinx is the next best client, developed by MRR Software. Like Twitterific, it offers a simple interface for viewing the latest tweets or updating your Twitter status and also can interface with Growl.

If you’re on a Mac and you use Twitter regularly, you should definitely download a Twitter client that fits your needs. Not only will it save you time, unnecessary refreshes and a tab in your browser but you will get updates as they come in- not whenever you happen to check Twitter.com. Look for more ways of keeping in touch with your Twitter friends in further additions to this series.


Introduction to BitTorrent: Part II: Using µTorrent

8 12 2008

For part I in this series see: Introduction to BitTorrent: Part I. This part will cover using µTorrent on Windows.

µTorrent is a free, light weight BitTorrent client maintained by BitTorrent Inc., who also maintains the BitTorrent Protocol. A study in PC World has shown that µTorrent is the number 2 peer to peer (P2P) client and the number 1 BitTorrent client.

This article will focus around using µTorrent for a beginner on a Windows system, although there is now a beta version of µTorrent for OS X.

Look for full setup instructions after the Jump.

Read more…


Nuevasync: Over the Air Syncing of Calendar and Contacts for your iPhone or iPod Touch

29 09 2008

Love the cloud? Always accessing your Calendars or Contacts from several places? Tired of having to connect your iPhone or iPod Touch to your computer to sync your contacts or calendar? Updated: NuevaSync has added new features! Learn more about them here.

Well, now you don’t have to. The easiest solution to this problem would be to hook up an exchange server to your iPhone so that it stays in sync, but unless you’re an enterprise user, you probably don’t have access to one. It’s not worth setting one up and, if you’re a Google user, you want your info synced there, not your work place. That is no longer a problem, thanks to a free service called Nuevasync. Nuevasync creates an exchange account running only the mobile protocol, and can sync your contacts and calendar with Google.

I originally found out about Nuevasync from a Lifehacker article offering Nuevasync as a Mobile Me alternative. I use Nuevasync with my iPod Touch, so no matter where I am or how I want to look at my data, I have access to it. It also makes it easier to enter a lot of data onto your calendar, and lets you easily import from web sources. Just add it to your Google Calendar and in about 5 seconds, it will show up on your iPhone (as long as you have service or Wi-Fi). This is especially helpful if you use shared calendars in a group setting, such as a family calendar or a group project calendar, by using Nuevasync you will always know that you have the most up to date version. The only catch is that currently, Nuevasync can only sync calendars that you have edit permissions for (there is a tool to help you figure out which ones those are, the link is after the jump) and they get merged all in to one calendar on your iPhone (they stay separated on Google Calendar).

Nuevasync was started in November 2007. Amazingly its creators David Boreham and Thomas Lackey never expected the high volume of users Nuevasync receives now. The original Nuevasync was designed as a Windows Mobile sync solution using Google Calendar and Plaxo (an online address book and social networking service) as data sources, but now Google Contacts as well as the other two are supported. Once Apple announced that they would be introducing Exchange server support with the 2.0 firmware upgrade, they got a beta copy of the firmware and began testing using an iPod Touch. They only expected a few iPhone users to be trying the service. Two days after the launch of the iPhone upgrade, Nuevasync’s servers were heavily hit, their user count had doubled. After that, Nuevasync began to drastically scale their code to support the new workload. Because of this, most of the planed new features had to be delayed. The two most requested new features are the ability to select which Google calendars are synced (including public calendar syncing) and for multiple calendar support. Both of these features are currently in development and is expected to be ready for testing within the next fe
w weeks. After that, the next feature to be released will be push email support from Gmail.

Probably the biggest reason people don’t currently use Nuevasync is that when you add an exchange server, all of your calendar and contact data on your iPhone gets erased, but the easiest way to avoid this is to sync your iPhone with Google via iTunes. I’ll walk you through the entire process to show you how you can have over the air syncing, without losing any of your data. Take a look after the Jump!

Read more…


Introduction to BitTorrent: Part I

26 08 2008

One of the leading Peer to Peer protocols is BitTorrent. If you don’t know about BitTorrent, this article is a brief overview of getting the most of BitTorrent on your Mac.

BitTorrent was developed by programmer Bram Cohen, who designed the protocol in April 2001. To this day, BitTorrent traffic makes up a significant, yet exactly unknown percentage of Internet traffic. BitTorrent works by transferring many small pieces of a larger file from many sources to later make one larger file, versus sequentially downloading a file from one source such as a HTTP transfer.

In order to transfer files using BitTorrent you need to get a .torrent file and open it with a BitTorrent client. The client will then connect you to a tracker, which will provide a list of peers for your client to connect with. You can get .torrent files from a number of places around the internet, some which are legal and some that infringe on copyrights. This part is up to you (remember, Google is your friend).

AAs for a BitTorrent client, there are a handful of BitTorrent clients for OS X that work great. However, by far the most feature rich, fast and user friendly is Transmission. Transmission is 100 percent free, open source program.

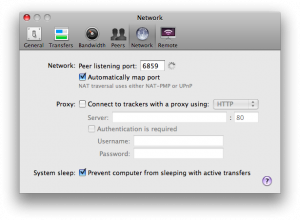
Once you have your torrent file in Transmission, the last thing you will need to do is forward ports. From within Transmission, you go into Preferences, and click on the Network tab. Remember the port number Transmission displays (or change it). To obtain your full potential of speeds, you will need to open a port from the Internet directly to your computer. This will require you to enter the configuration page of your router and forward the port or enable NAT-PMP or UPnP (to let Transmission do the work). Configuring your router will vary by the manufacturer, so check out this site for a guide to your router.

This is a beginners guide to starting to use BitTorrent on OS X. Look for more parts coming soon, in more detail.


MobileMe: Managing Your Web 2.0 Calendar on Me.com

21 07 2008

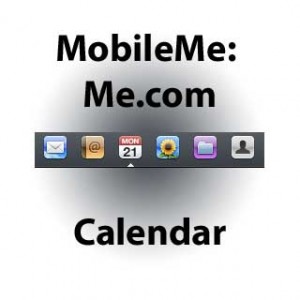
At the front end of the new MobileMe launch, Me.com consists of a slick Web 2.0 interface for your Calendars, Contacts, Photos and Mail. This is an in depth look into the online Calendar portion of the suite.

Once you have MobileMe synchronized with your computers and mobile devices, you can make changes online at Me.com and your other computers or devices will be automatically updated. This means that virtually anywhere you have access to the internet, regardless of what computer or mobile device you may (or may not) have access to; you can make changes to and access your data.

For those who have become accustomed to using iCal, the Me.com calendar carries over almost every feature- with the exception of an alarm function to the web. This powerful web application is based on the latest Web 2.0 technologies, and allows for a near desktop application replication.

To create a new calendar appointment, simply click on the calendar at the appropriate time, much like you would in iCal. The familiar event bubble will pop up corresponding to what color calendar you’re in. You can then enter text for the name of the event, drag it to correctly represent the time or double click on it to see even more options. If necessary, you can even drag the appointment across your calendar to change the date.

The MobileMe application even allows for Keyboard Shortcuts, for example, if you would like to delete an event, you simply press the delete key.

To create a new To-Do, press Control and “K” and your To-Do list will appear with a new event.

Read more after the jump! Read more…


3 Ways to find App Store Applications for your iPhone and iPod Touch running firmware 2.0

18 07 2008

Most people are amazed with some of the applications that have been coming from the App Store.

AppStore, apart of the iPhone OS 2.0

AppStore, apart of the iPhone OS 2.0

Apple claimed a catalogue of over 500 applications on the App Store’s July 11th launch. Just a week later, this has grown to over 700 applications- with many developers anxiously waiting for their applications (or updates) to get updated.

For those who have updated to the new firmware 2.0, you probably have found a number of applications you are really enjoying. However, the more you explore, the more pleased you might get. There are really hundreds of awesome applications on the App Store- some of which you may not know about. Here are a couple of ways to keep on top of the App Store- from the latest additions, hottest applications and updates to current applications.

Chris Pirillo recently created a Slinkset based application, that is a social news site for iPhone applications like Digg. You can find the most popular applications, voted on by users, and comments about each application. This is a great forum to be introduced into new applications, and read comments that are actually relevant (unlike a typical iTunes review).

MacRumors editor Arnold Kim has created a website, dubbed Touch Arcade, which provides extensive coverage of iPhone games. This is a high quality site for those looking just for iPhone gaming coverage.

PinchMedia offers RSS feeds from the App Store in four categories: Top Paid, Top Free, Updated and New Apps. You can subscribe to these feeds in your favorite RSS browser to watch as new updates and applications roll in; and stay on top of the most popular applications.

There are many apps to be discovered, and loads added each day. It is up to you to stay on top of them!


A Guide to iPhone OS 2.0: Tips, Tricks and New Features!

17 07 2008

With last weeks release of the iPhone 2.0 OS for iPhone and iPod Touches, Apple has added a host of new features. Among the most prominently covered is the App Store, however there are many other refinements under the hood- take a look.

The 2.0 firmware adds a large number of fixes, refinements and additions to the iPhone platform. Free for existing iPhone owners and a $9.95 upgrade for iPod Touch owners, 2.0 adds the App Store as well as Microsoft Exchange support and many other enterprise level features. Below are some lesser known additions to the iPhone OS 2.0 firmware:

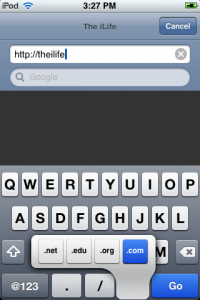
If you are entering a URL in Safari, for example, you’re probably aware of the .com button. In the new 2.0 firmware, if you would like to type in .edu, .net or .org, if you hold down the .com button and you are presented with “.net, .edu, .org and .com” as an option.

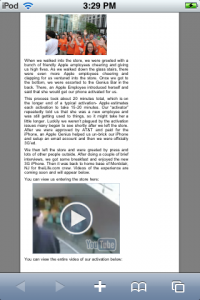
Like QuickTime movies, the new Safari version found on iPhone OS 2.0 allows you to see embedded YouTube videos. If you click on an embedded YouTube video, the video launches in the YouTube application.

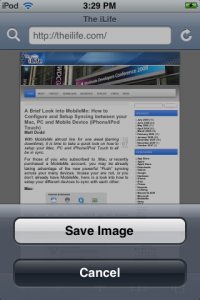
If you see an image you would like to save while in Safari or Mail, if you tap and hold down the image, a prompt will ask if you would like to save the photo. Your saved photos can be found the Camera Roll as well.

If you want to take a screenshot from your iPhone or iPod Touch, hold down the home button and click the Sleep/Wake button at the top and the screen will flash. Whatever was displayed on your screen will be added to your Camera Roll.

If you want to jump to the top of a page in Safari, or your Inbox in Mail, simply tap the Menu bar (where the time and battery information is displayed) and it will jump to the top.

Continue reading after the jump for more new features! Read more…